Managing savings: A single separate bills bank account
This user guide covers how to manage savings for large annual or periodic expenses using a single separate bills account from your main account, using transfer budget(s) to forecast that you have put away enough to cover your bills.
If you would like to open multiple savings accounts to split up your savings, please see: Managing savings: Multiple separate bills bank accounts.
If you would prefer or need to manage all your income and savings within one account (e.g. an offset account), please see: Managing savings: Within only one account.
In this user guide
Overview
You can use PocketSmith to help calculate the savings needed to cover large, periodic bills throughout the year.
There are three main stages that this guide will follow:
- Adding your new bills savings account to PocketSmith
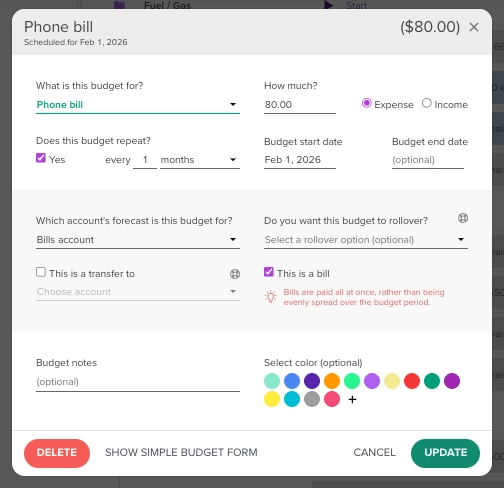
- Adding expense budgets for each of your bills, reflecting the amount and date the payment will be made
- Calculating the amount you'll need to set aside to cover your larger annual or periodic expenses and create a transfer budget(s) reflecting the amount and frequency of your contributions to your bills savings account
Once your categories and budgets are set up, you can use the Calendar page or the Dashboard to see if you're on track to cover your larger periodic bills.
Read on for the steps if this is something you are after.
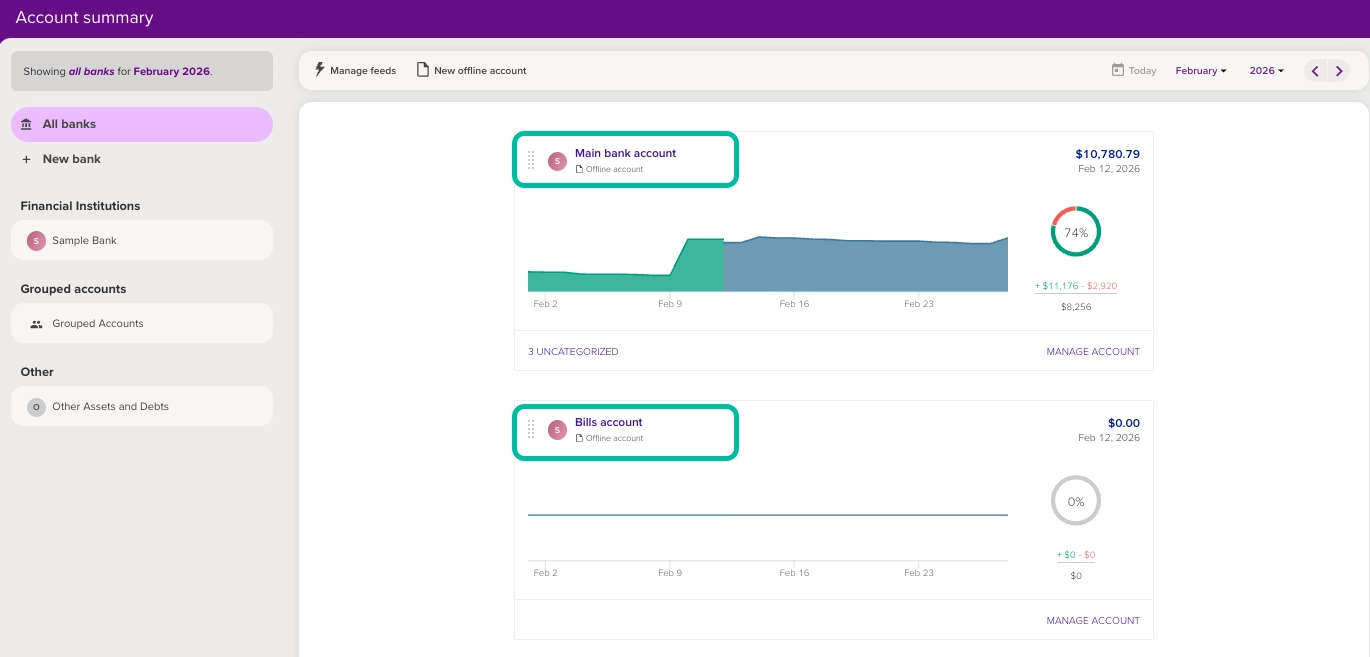
1. Open a separate bank account
Create a separate bank account with your bank to transfer your savings for large bills, and add it to PocketSmith.
For details on creating a new account in PocketSmith, see: Adding a new account on the Account Summary page.
2. Adding the expenses to PocketSmith
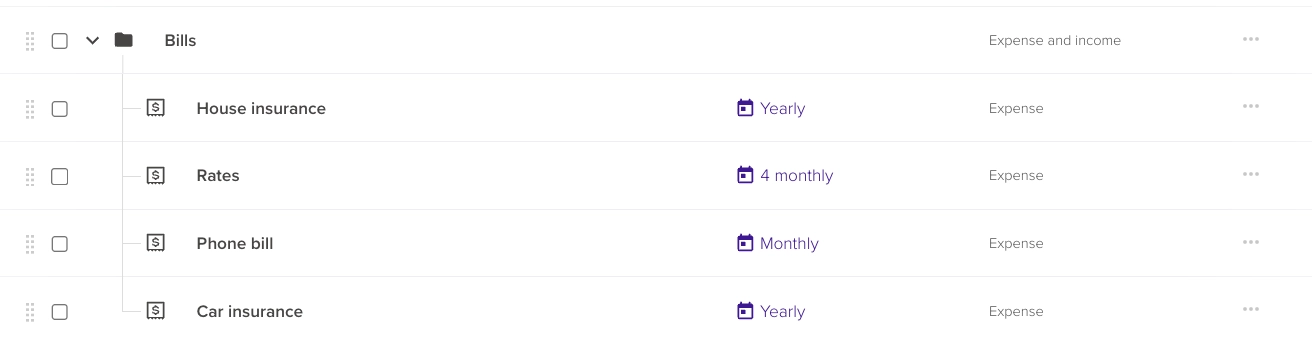
Create categories for each of your bills
Next, create a specific bill category for each of your bills. To learn more about creating categories, please see: Adding new categories.
These will need to be bill categories in particular, please see: Bill and scheduled income categories for more details.
We recommend creating a parent category, e.g. “Bills”, to nest your individual expense categories underneath as sub-categories.
For more details on nesting categories, please see Sub-categories and nesting.
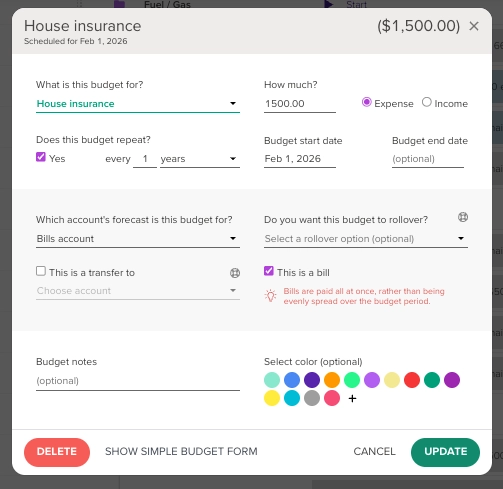
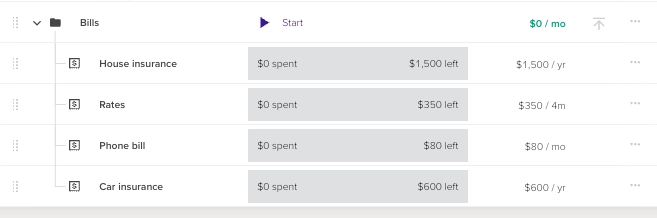
Create bill expense budgets
You'll then need to set up an expense budget for each bill category, based on each bill’s recurring due date.
These budget events show when funds are due to be debited from your account and should be as close as possible to the actual expense dates for the most accurate forecasting.
Under 'Which account's this budget for', select your Bills account.
For more details on creating budgets, see: Creating a new budget.
Tip
Where possible, switching your bills to the annual payment frequency can sometimes lead to increased savings. E.g. paying for your car insurance annually as opposed to monthly.
Bonus tip: Staggering these annual bills so they don’t hit all at once can help make things more manageable. E.g. having your car insurance due in March, and your car registration due in November.
3. Calculating and transferring your savings amount
From here, decide if you would prefer to transfer one larger lump sum from your main account to your bills account that will cover all bills, or if you would prefer to transfer smaller specific amounts earmarked for certain bills.
The guide will look into each of these in turn.
Larger lump sum transfer approach: Calculate the amount to save
Calculate the total amount needed to cover any large periodic bills over the year, and then work out how much you'll need to set aside on a regular basis to meet this amount.
You can use PocketSmith to calculate this amount by using the Budget page and the category nesting from Step 2 🙌
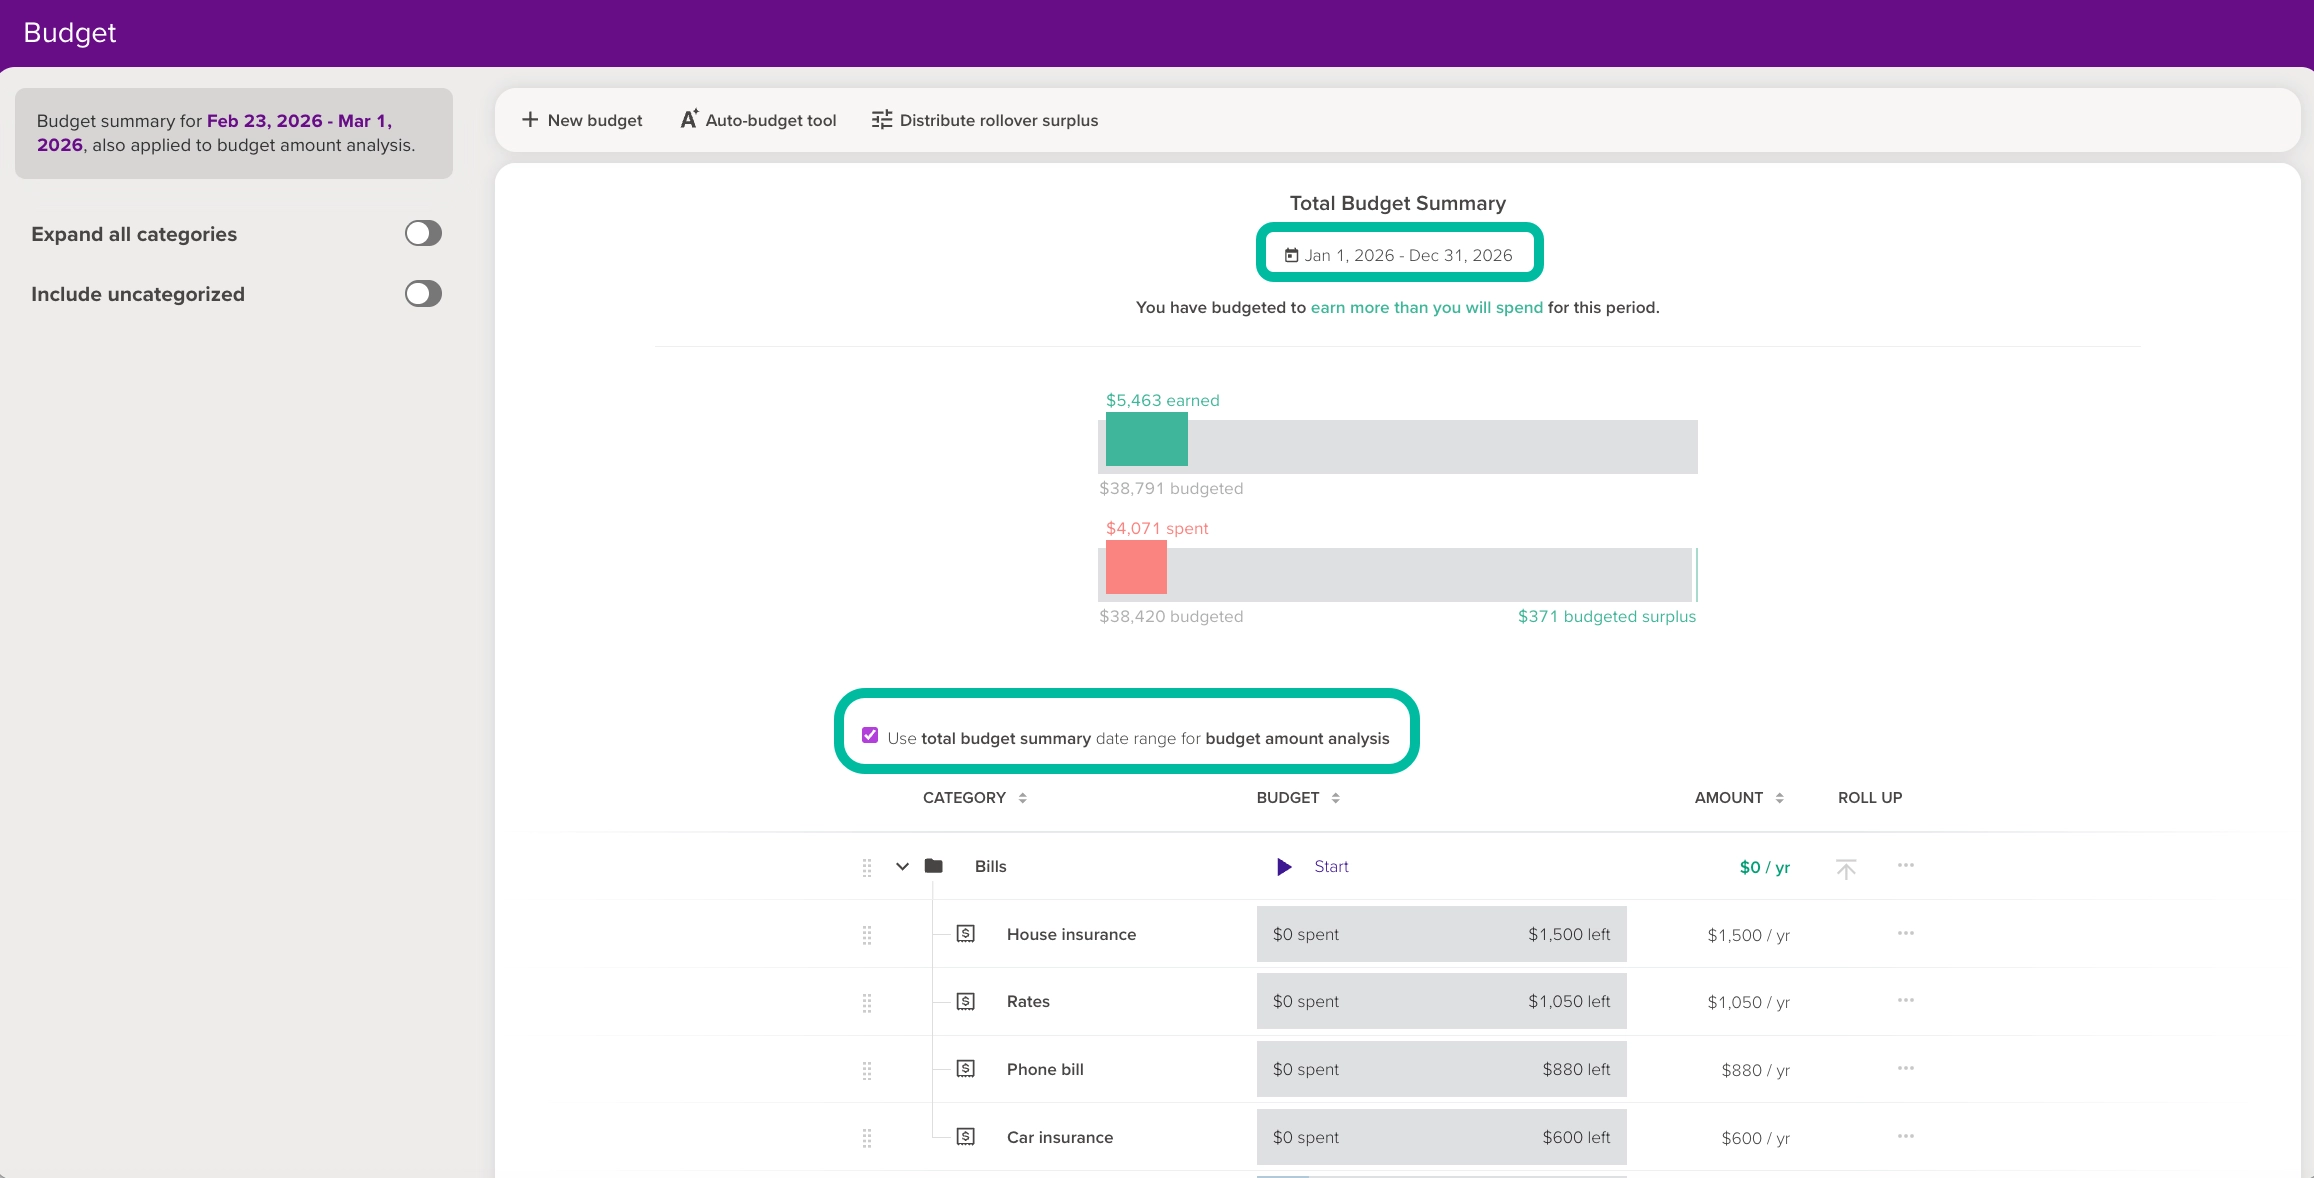
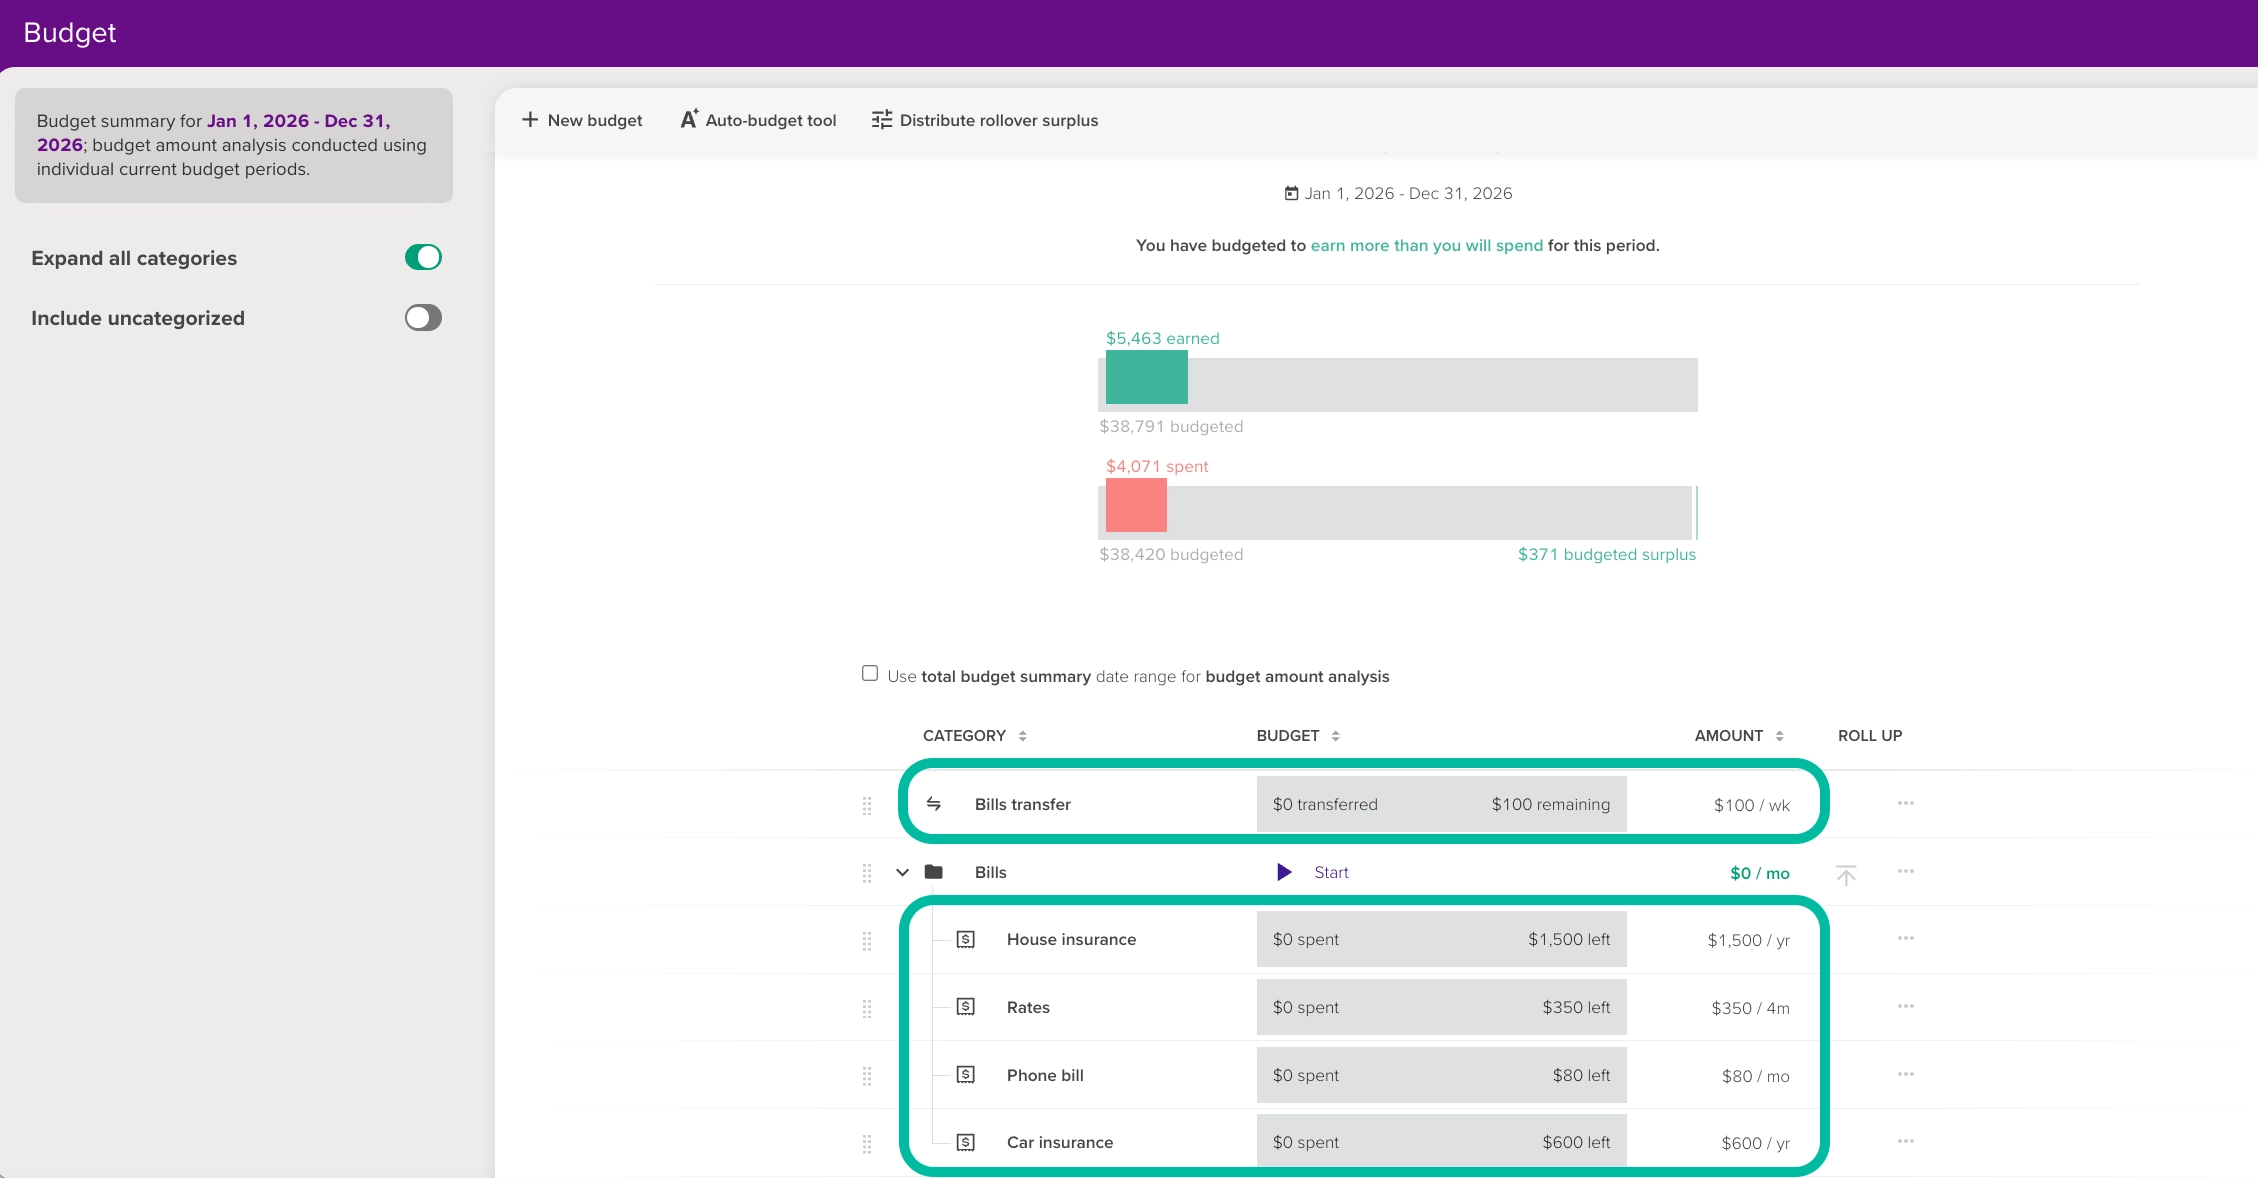
- Head to the Budget page
- Change the Total budget summary date range to This year and select Use Total budget summary date range for budget amount analysis. This will show you the annual budget amounts for your sub-category budgets (even if they occur at different intervals).
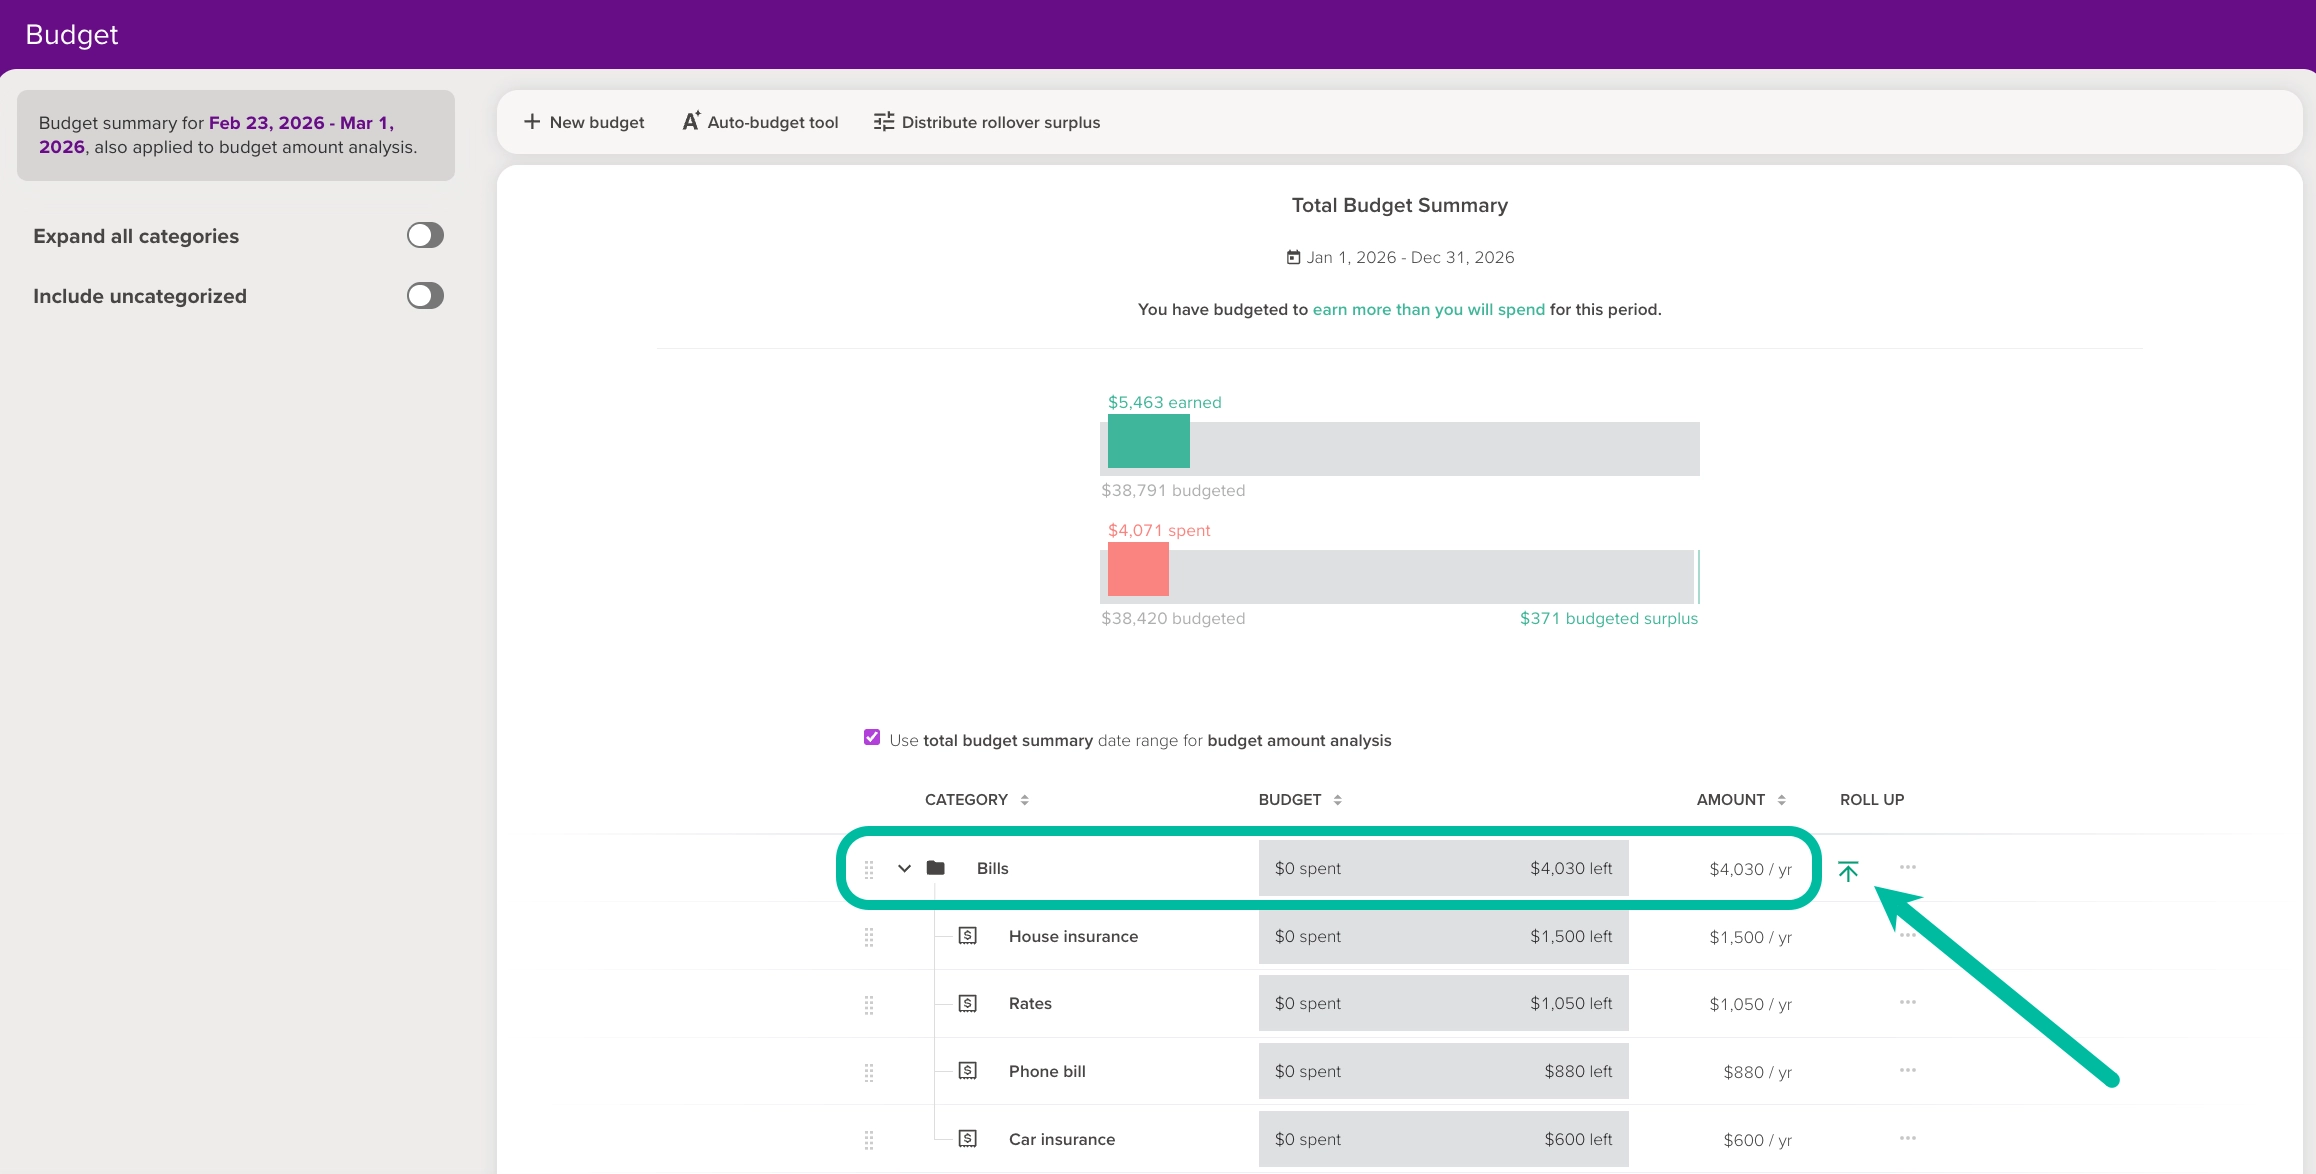
- Click the Roll-up arrow next to your Bills parent category. This will show you the total annual amount needed for your expense budgets each year.
- Divide this total amount by your income frequency (e.g. if paid weekly by 52, fortnightly by 26) and this is the amount to transfer from your main account into your bills savings account each pay.
Tip
Where possible, bumping up this transfer amount can help provide a nice buffer to cover unexpected costs or fluctuations.
Bonus tip: Use automatic transfers for this if your bank offers them. Set the transaction references to be related to the savings goal each transfer is for, to allow for easy categorising with category rules.
Larger lump sum transfer approach: Transfer category
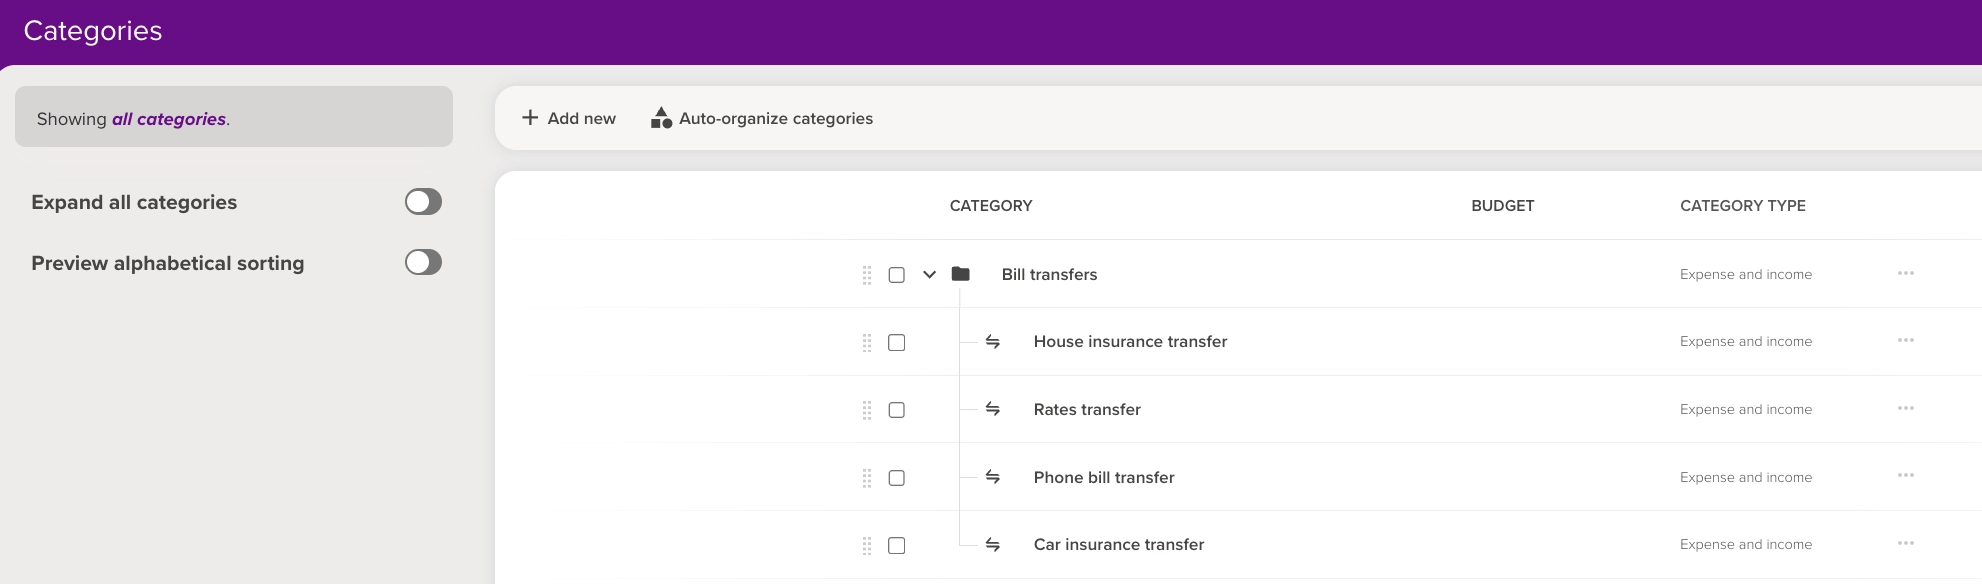
Next, set up a transfer category to assign your transfer transactions from your income account to your Bills account.
To learn how to create a transfer category please see: Steps to create a transfer category.

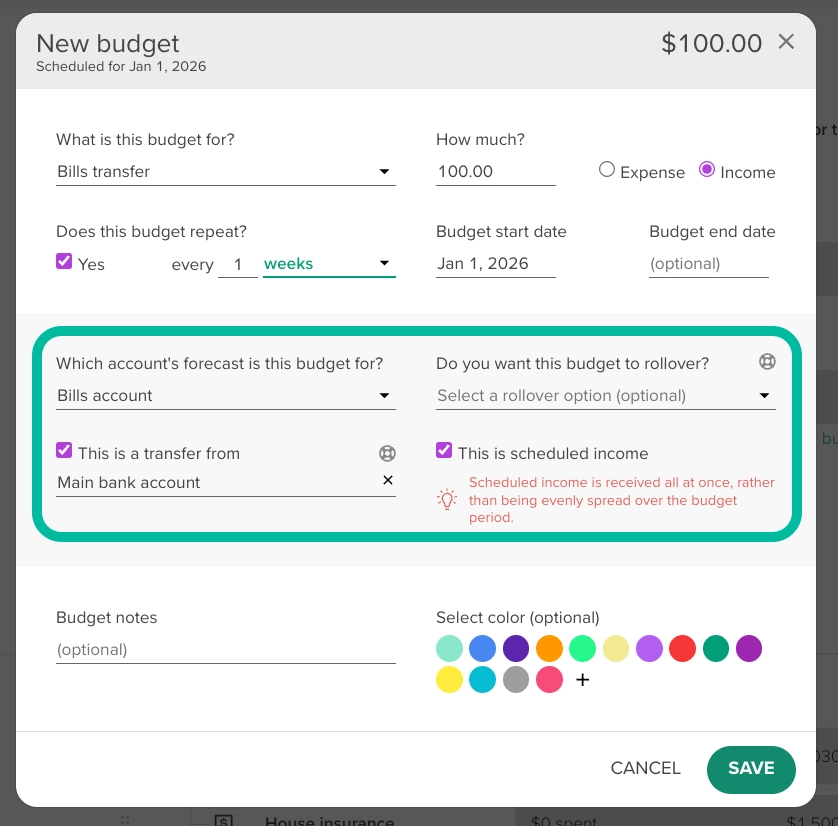
Larger lump sum transfer approach: Transfer budget
Now, you'll need to create a transfer budget, reflecting the amount and frequency of your regular contributions.
These budgets will allow you to forecast the amount of money coming into the Bills account.
For details on creating a budget like this, see: Creating a transfer budget.
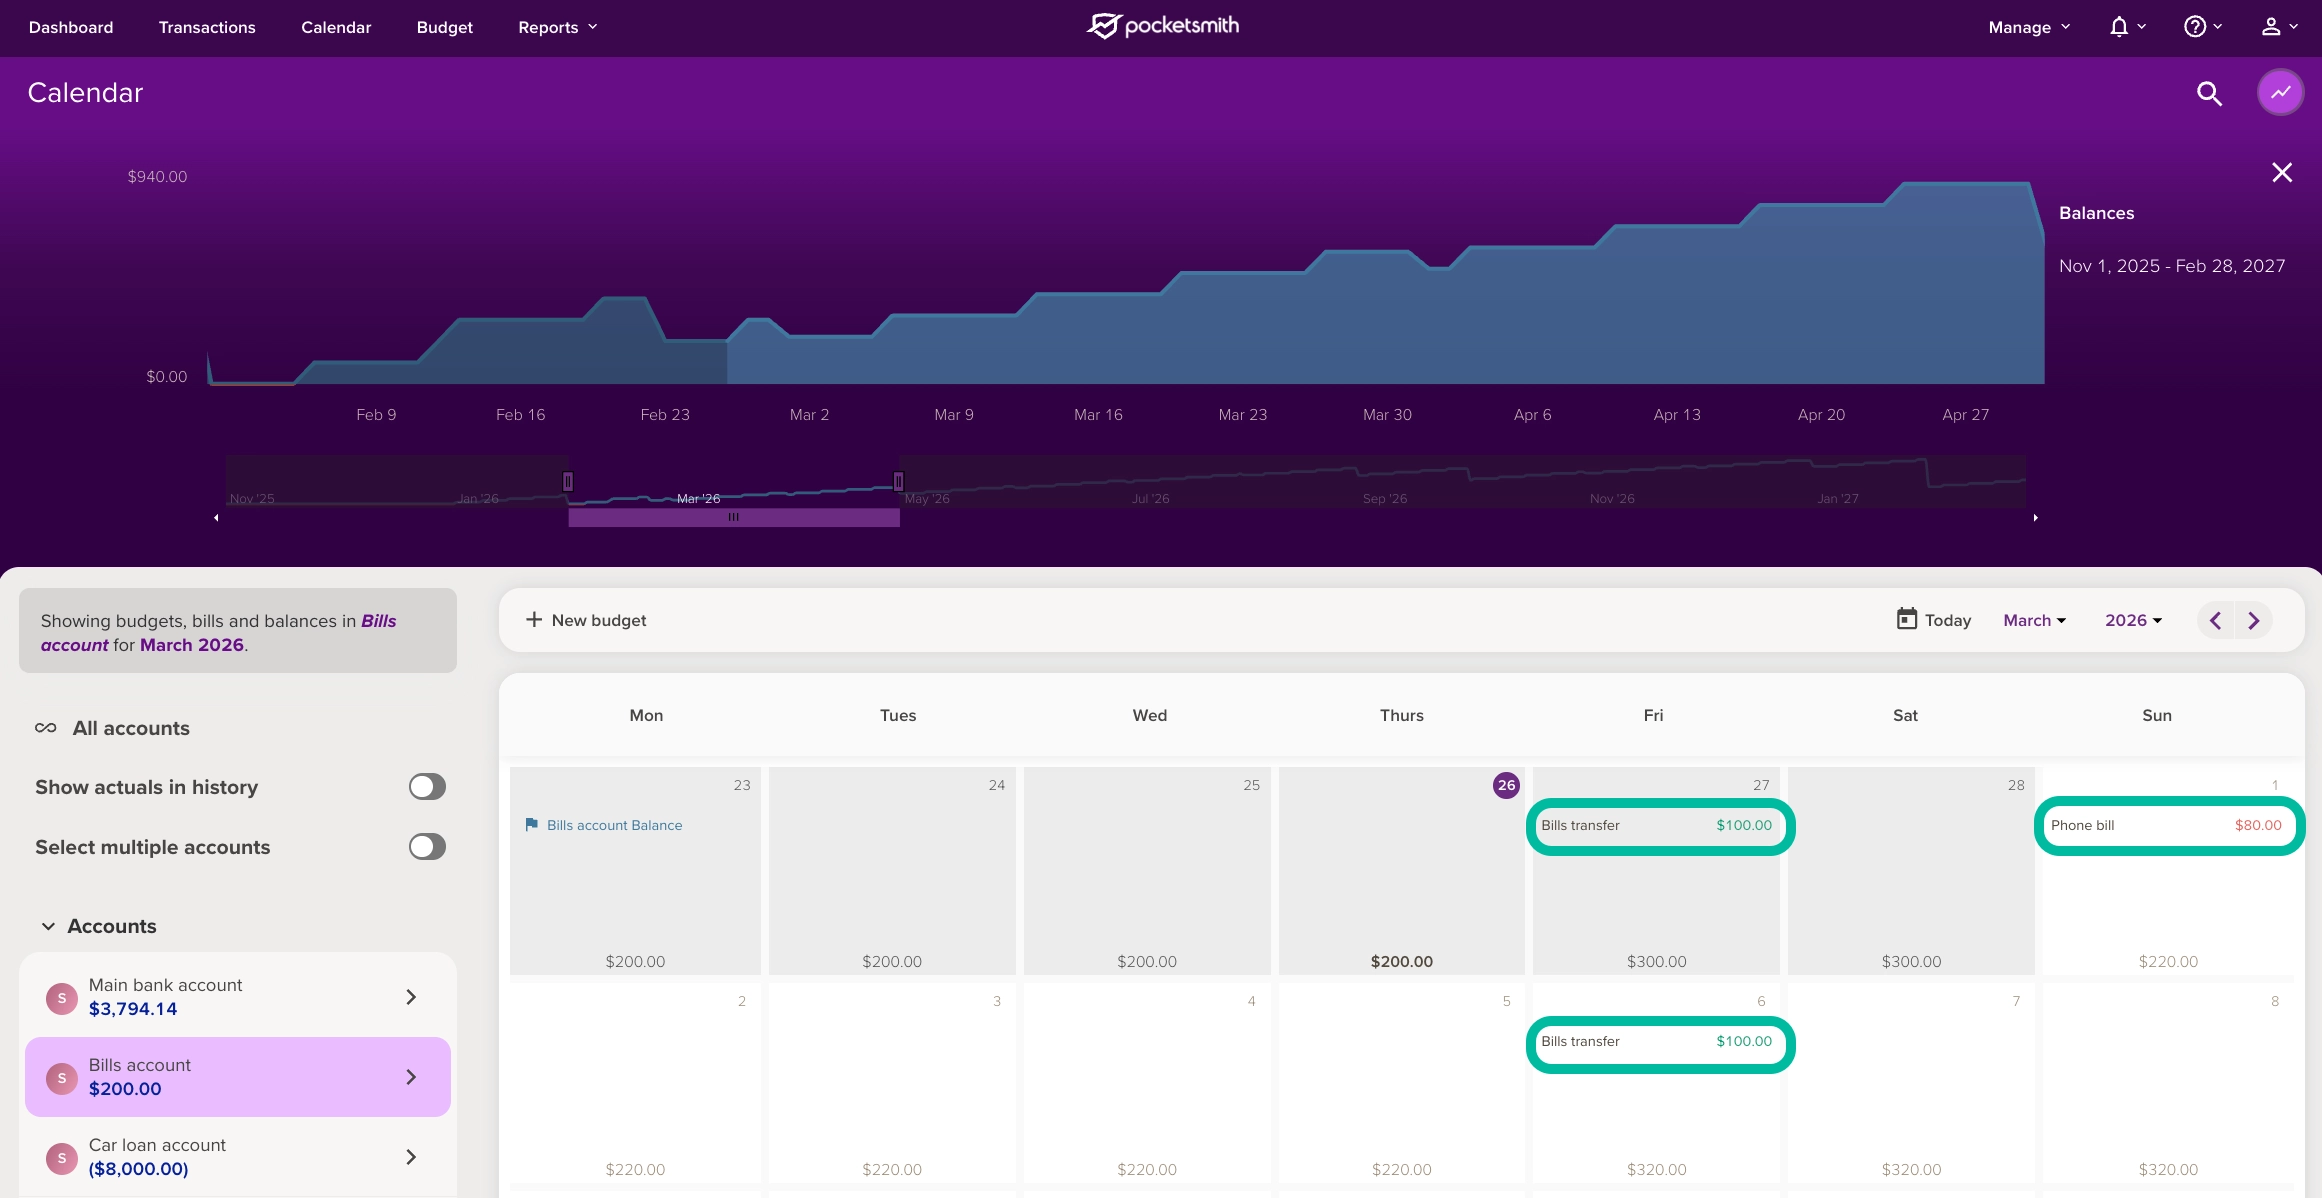
In this guides example, the annual total of the bills expenses was $4,030 a year.
Breaking this down to a weekly amount to reflect a weekly pay schedule, this would be $77.50 (4,030 divided by 52). For an extra buffer, I will bump this up to transfer $100 a week.
Granular transfer approach: Calculating the amount to save
With the smaller transfer approach, you will need to create transfer categories and transfer budgets for each of your individual bills.
To calculate the amount to save for each transfer category:
- Head to the Budget page
- Change the Total budget summary date range to This year and select Use Total budget summary date range for budget amount analysis. This will show you the annual budget amounts for your sub-category budgets (even if they occur at different intervals).
- Divide each of these amounts by your income frequency (e.g. if paid weekly by 52, paid fortnightly by 26) and this is the amount to transfer from your main account into your bills savings account each pay for each specific bill.


Tip
Where possible, bumping up this transfer amount can help provide a buffer to cover unexpected costs or fluctuations.
Bonus tip: Use automatic transfers for this if your bank offers them. Set the transaction references to relate to the savings goal each transfer is for, to allow for easy categorisation with category rules.
Granular transfer approach: Transfer categories
You can set up separate transfer categories to assign your contributions to your Bills account.
To learn how to create a transfer category, please see: Steps to create a transfer category.
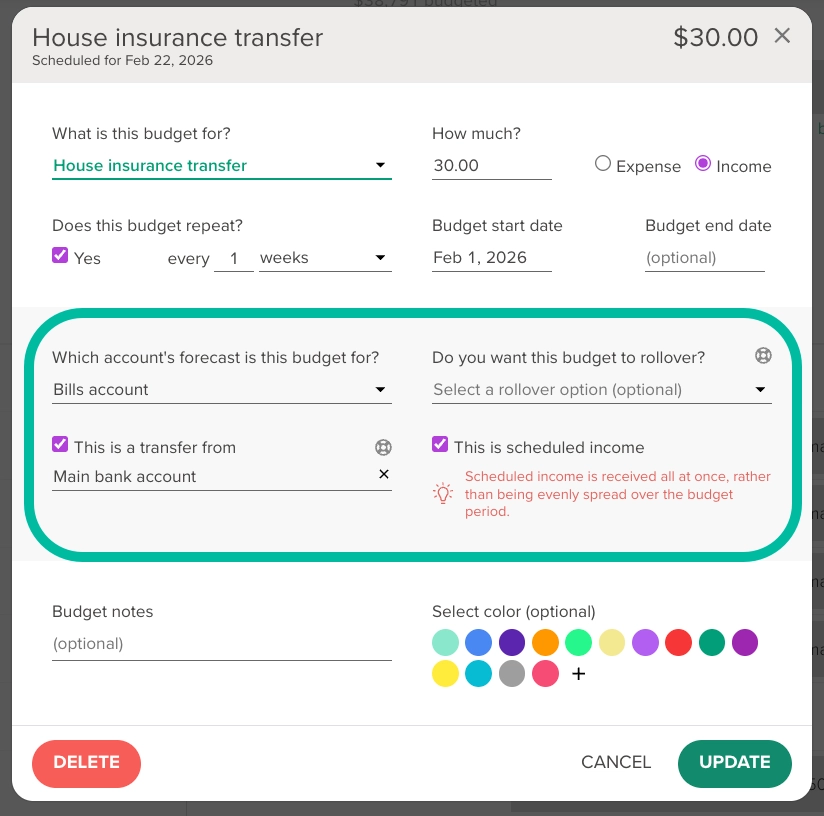
Granular transfer approach: Transfer budgets
Next, you'll need to create a transfer budget for each transfer, reflecting the amount and frequency of your regular contributions.
These budgets will allow you to forecast the amount of money coming into the Bills account but split by each transfer category.
For details on creating budgets like this, see: Creating a transfer budget.

Handling internal transfers for making the expense payment
Once your bill is due, you may run into the common scenario where you make the actual expense payment itself from your main everyday account, as this is the account associated with your bank card (so not your savings account).
To make this payment, you will need to transfer the bill amount from your savings account to your main account. For these transfers, we generally recommend assigning them to an “Internal transfers” transfer category.
You can then assign your bill expense transaction to the bill expense category and budget you created in Step 2 of this guide. Any transaction assigned to a category will contribute to the budget, so it is no problem that the expense transaction was not from your savings account.
For more information on creating a transfers category for any internal transfers between accounts, please see: Steps to create a transfer category.
Looking ahead: Forecasting your savings build-up
Once you're all set up, head over to the forecast graph on the Calendar page to see your projected balances based on your budgeted events in your Bills account.
- Head to the Calendar page
- Isolate your bills account
You'll be able to see when each of your bills are due, and whether you'll have enough money to cover the expense on the due date.
You’ll see the income side of the transfer budgets increasing the forecast balance, and then dipping with the expense budgets:
For more details on using the Calendar and Forecast graph to see your projected balances, check out: Using the Calendar.
Keeping an eye on your bills account balance
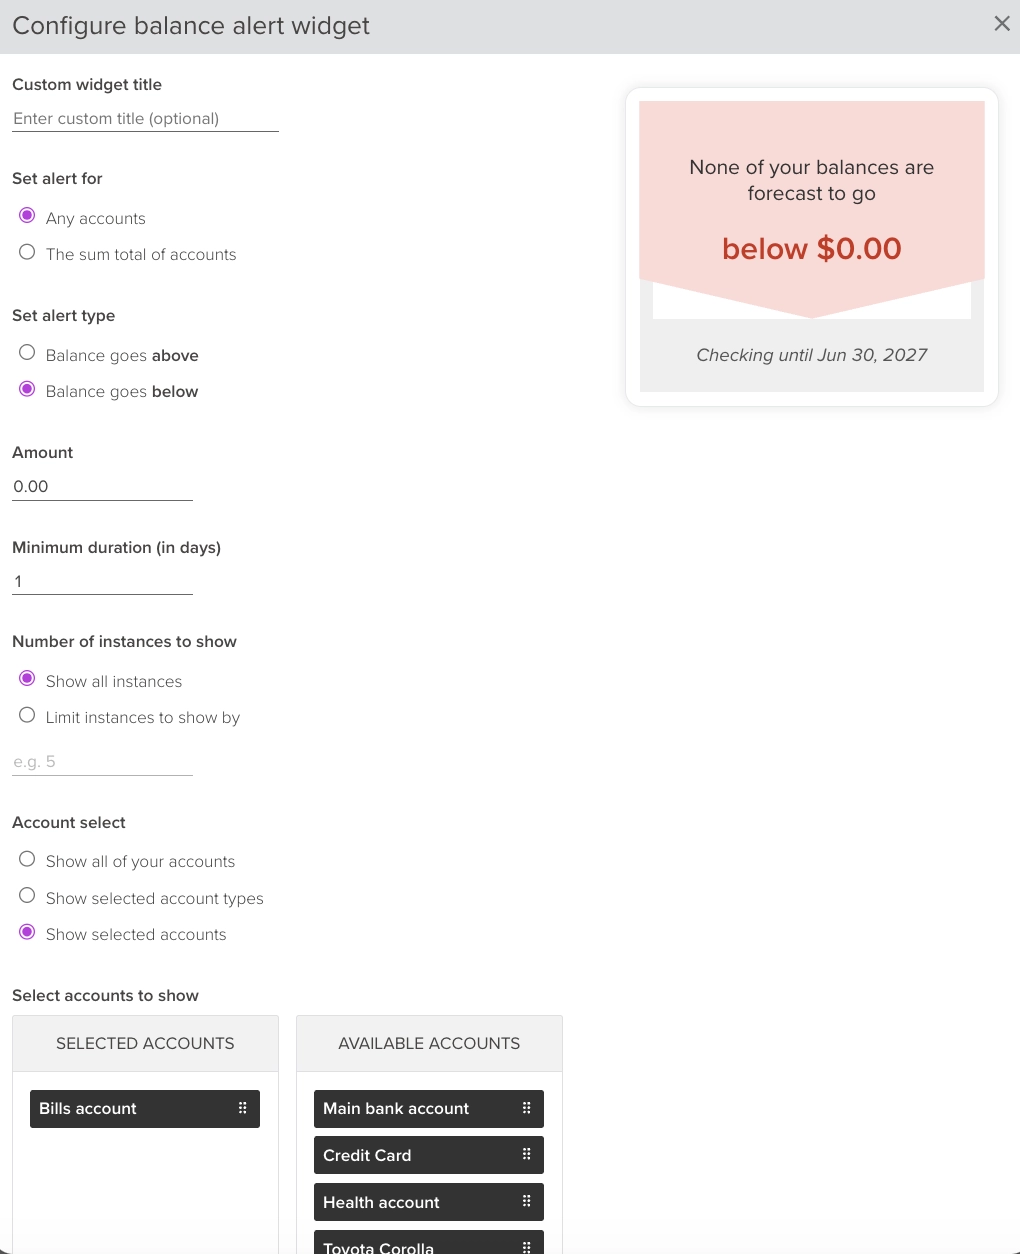
Keep an eye on your bills account balance and be alerted when it reaches or exceeds a chosen balance amount with the Dashboard balance alert widget.
Configure the Balance alert widget for your Bills account and set the alert to show you if the forecast is due to go below a chosen balance, e.g. $0.00: