PocketSmith iOS App
Our iOS app is designed as a companion app, providing users with some of the key elements of PocketSmith - right there in your pocket!
Because our mobile apps are not designed as a standalone interface, they won't include all the features found on our web and desktop applications. We are regularly releasing updates to the PocketSmith iOS app with improvements and new features. The iOS app can be downloaded from the App Store 📱
In this user guide
Dashboard tab
The Dashboard gives you an overview of your finances on the move. From your Dashboard, you can get information on your net worth, top accounts, categorization progress, and a summary of your budget tracking at a glance! You can click on the different widgets to access more information about your finances.
Dashboard widgets
- Current date
- Net Worth
- Your balances
- Your bank feeds
- Spending breakdown
- Uncategorized transactions
- Top Accounts
- Budget Summary
- Your favorite budgets
- Transactions confirming
- Attachment Inbox


Turning widgets on or off
Tap Edit from the Dashboard if you want to change or rearrange your widgets:


Transactions tab
Tap the Transactions tab to view your transactions. From here, you can search transactions from the search bar or choose to view all transactions, uncategorized transactions, or only your income transactions, by selecting these options from the menu at the top of the screen.


Calendar tab
Tap Calendar to view your budget events, as well as forecast and actual daily balances. You can also edit existing budgets or create new budgets from the Calendar.

Viewing budgets on the calendar
The Calendar shows you, at a glance, when you have budget events scheduled. First, ensure that the Calendar is set to view Budgets. A green flag indicates an income budget, whereas a red flag indicates an expense budget. Grey flags indicate transfer budgets.
Tap on a date to view the budgets scheduled for that day.

Creating, editing, and deleting budgets
Tap the + icon in the top right to create a new budget, or tap on an existing budget to edit or delete the budget.

For more detail on creating, editing, and deleting budgets, please see: Creating, editing, or deleting budgets
Viewing balances on the Calendar
View balances on the Calendar by tapping Balances below the calendar.
The current date and any past dates will display the actual balance at the bottom right, whereas any future dates will display the forecast balance.

Scroll down to see a breakdown of contributing account balances.
- For the current date and any past dates, you'll be able to see the forecast balances compared to your actuals.
- For any future dates, only the forecast balances will be displayed.

Budgets tab
Tap the Budget widget from the Dashboard or head straight to the Budget tab to quickly see an overview of both your budget summary and your individual budgets.


The top of the Budget tab screen shows a summary of your overall budget for the current calendar month. Scroll down to see how your individual budget categories are tracking for their respective current budget periods. If you use nested categories, you'll see the parent category in front of each of the sub-categories.

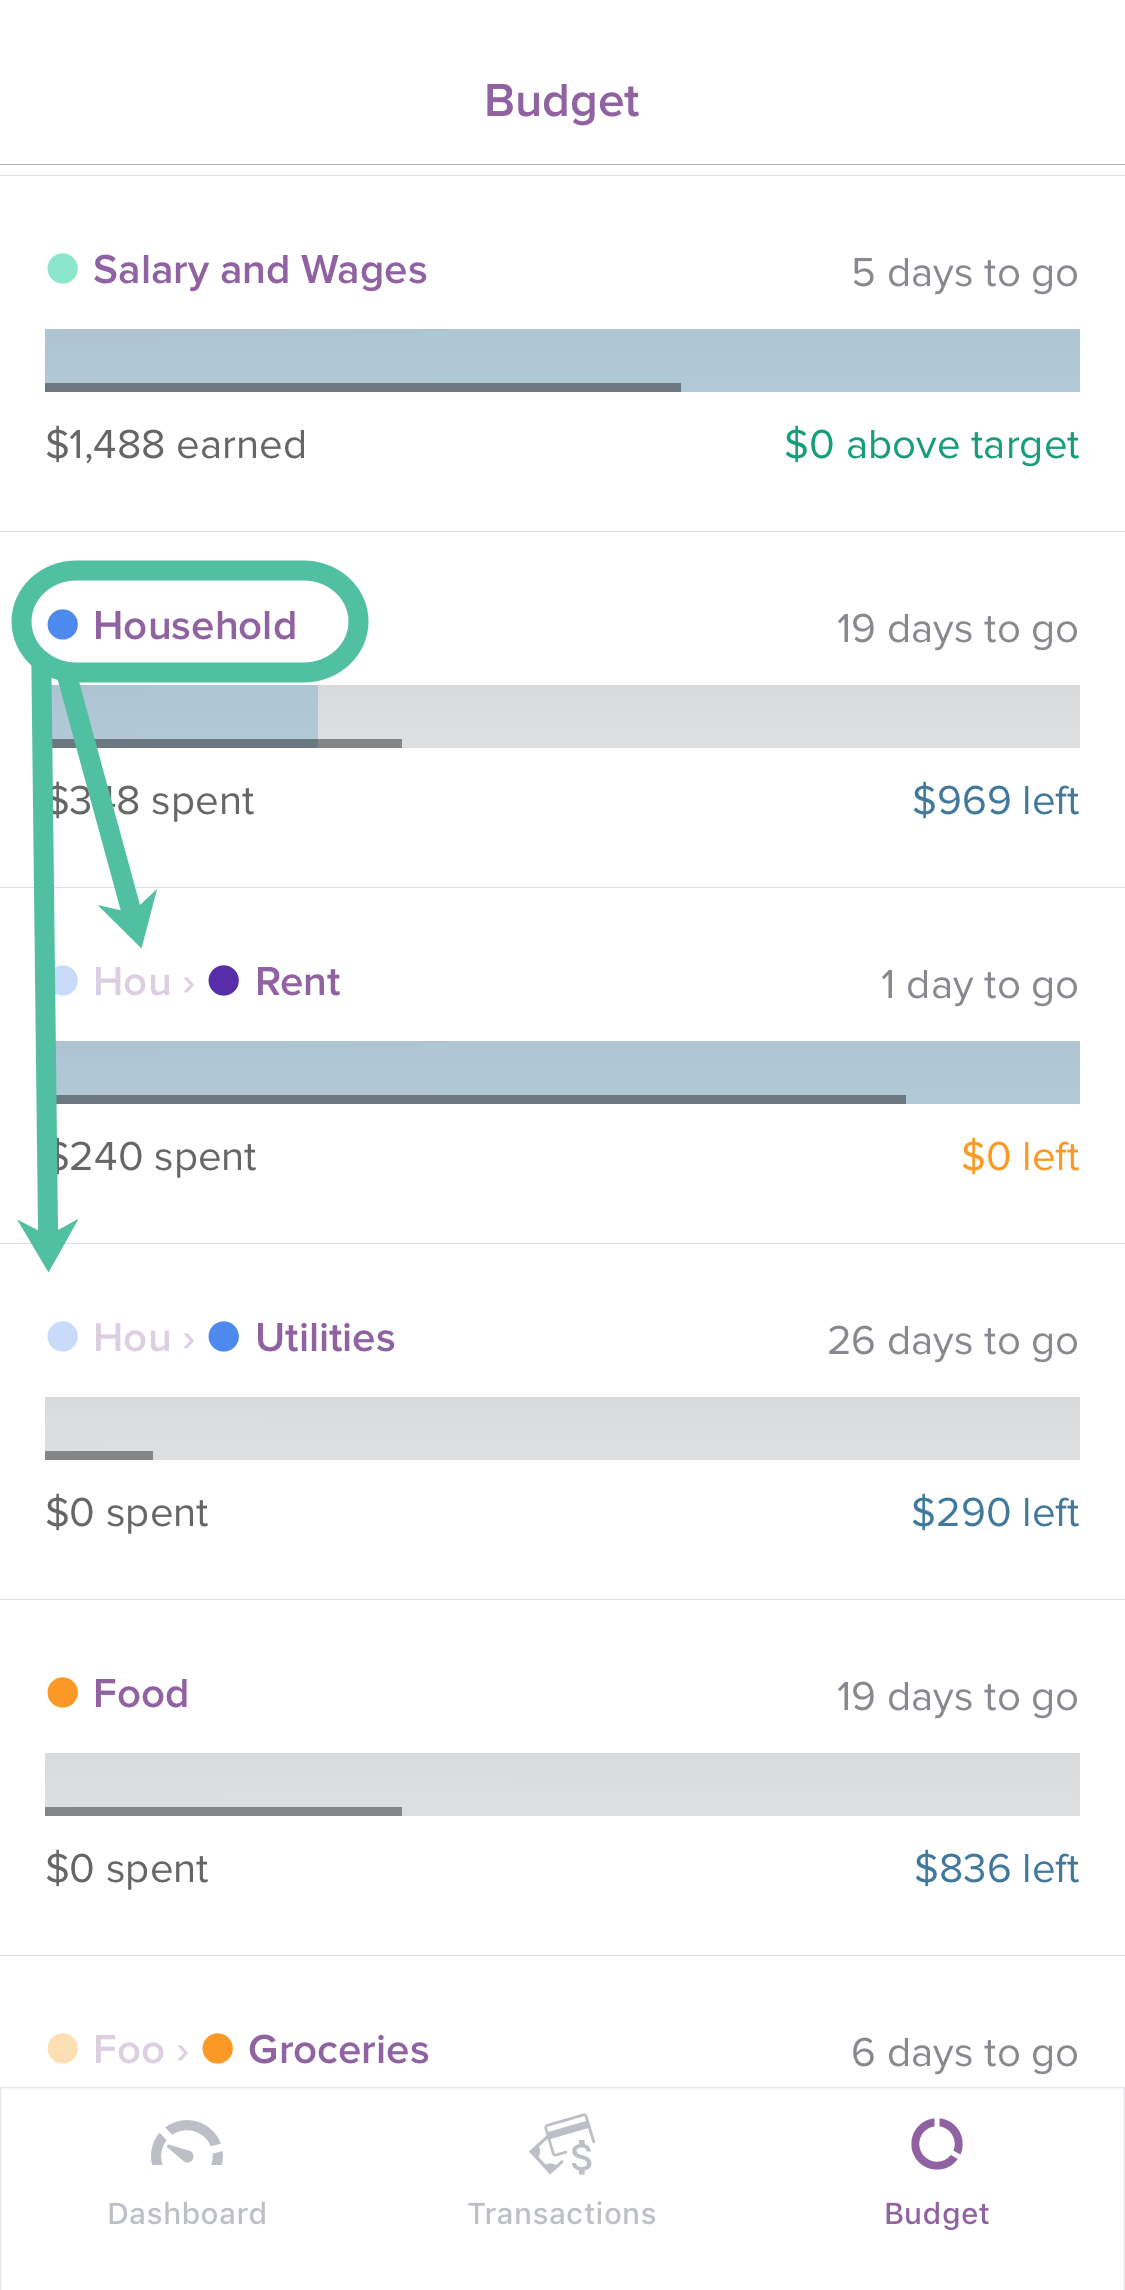
Select any of your individual budget categories to see all assigned transactions for that period. If you're viewing a subcategory, you'll see the parent category greyed out above the category name:

Trends
To see trends for a budget category, tap View trends when viewing the budget.

A trends graph will show, with a summary below for the selected budget period. To view the summary for a previous or future period, tap the corresponding column.
Tap Transactions to view the transactions that have contributed to the budget for the selected period.

To adjust the period reflected by the bar graph, or, the number of budget events/periods viewed overall, tap FILTERS and edit to suit.

Your favorite budgets
Your favorite budgets widget lets you view your favorite budgets at a glance.
Tapping the top of the widget will take you to the overall budget screen, while tapping a category row will take you to that category's budget.

Selecting your favorite budgets
To select the budgets you'd like to display here, tap Edit in the top left of the app, and then tap on the cog beside 'Favorite Budgets' in the widgets list.

Use the toggle beside a category to select it as a favorite budget.

Creating, editing, or deleting budgets
You're able to create new budgets, edit existing budgets, or delete budgets from the Calendar tab. Tap Calendar at the bottom of the screen to access the Calendar tab.

Creating a new budget
- 1
-
Tap the + icon in the top right of the Calendar to create a new budget.

- 2
-
Fill in the budget details, including category, date, budget type, amount, and frequency.

Tip
The start date will default to the date you are currently viewing in the calendar. To select a different date, tap the date field, and use the date selector.
Transfer budgets
Please note that it is not yet possible to create a transfer budget via the mobile app, and you'll need to do this via the web app. For detail on how to do this, see: Creating a transfer budget
- 3
- Tap Save to save your new budget


Editing budgets
Within the mobile app, you are able to edit the following details for a budget:
- the amount
- add a note
- the repeat period
To edit a budget, locate the budget or the specific budget event on the calendar, then:
-
Tap on the budget to view the budget details

-
Edit the details as required, then tap Save

-
Choose how you'd like the budget changes to be applied:

This occurrence only:
Use this option if you want to edit just this one specific budget event within the repeating budget series, leaving others unchanged.
This and future occurrences:
Updates the selected budget event and all future events in the series. All budget events before the selected date remain unchanged.
All occurrences in this series
This will edit all budget events within the budget series from the start date onwards, apart from existing one-off exceptions from previous "this occurrence only" edits.
Editing other budget details
Please note, that it is not possible to edit the following budget details via the mobile app:
- the budget date
- the account a budget is assigned to
- the budget type (ie. income or expense)
To make these changes, you would need to use the web app, following the steps outlined here: Editing, moving or deleting a budget
Deleting budgets
You're able to delete a single budget event or an entire budget series, as shown below.
- Locate the budget or the specific budget event on the calendar, then tap on the budget to view the budget details.
-
Tap Delete
-
Choose how you would like the deletion to apply.
This occurrence only:
Use this option if you want to delete just this one specific budget event within the repeating budget series, leaving others intact.
This and future occurrences:
Deletes the selected budget event and all future events in the series. All budget events before the selected date remain intact.
All occurrences in this series
This will delete all budget events within the budget series.
Accounts
Your top accounts widget on the dashboard shows the current balances of your most-used accounts.
Tap on an account name to see the transactions within, or tap Tap to see more to view all of your accounts, edit account details, or change the order of your accounts.

Change the order of your accounts
To change the order of your accounts, tap Edit. You'll then be able to drag and drop accounts into your preferred order. Tap Done to save.


Edit the details of your accounts
You're able to edit the account name, currency, or account type via the mobile app.
To get started, tap Edit. Then, beside the account you would like to edit, tap 'Tap to edit'.
Edit the account details as desired, and tap Save once you're happy with your changes.


Your bank feeds
Opening the mobile app will trigger a sync of your bank feeds.
The bank feeds widget on the dashboard shows an overview of your current bank feed sync status

Tap the bank feeds widget to provide more details about the individual bank feed connections

Below the graph, you'll see a list of all the included accounts, with the combined total at the bottom.

Net worth
Tap the Net Worth widget from the Dashboard to see a break down of what you own and what you owe:


Your balances
The Your balances widget displays the combined balance of all, or a selection, of your accounts. You'll be able to see both your actual and forecast balances.

Select 'Tap to see more' for more detail on this graph. From here, you can drag the slider (dotted line) forward or back to display different dates.

Below the graph, you'll see a list of all the included accounts, with the combined total at the bottom.

Balance options
If you'd like to display only a selection of accounts here, you can do this by tapping the FILTERS button in the top right.
From here, you can toggle any accounts that you don't want to see here to off. You can also adjust the date range of the forecast by changing the number of months showing.

Categorize and edit your transactions
Categorize or edit your transactions straight from the mobile app!
From the transactions tab, select any transaction to make changes, add notes, labels, and attachments, categorize, create a category rule, and mark as a transfer.
Or, tap the categorization widget from the Dashboard to see your uncategorized transactions.


Tap on a transaction, then tap Select a category to choose or create a category to be applied to it:


Create category rules:
If you'd like to, you can create a category rule by tapping ADD RULE.
If the merchant description includes extraneous information, such as timestamps or transaction numbers, then it's best to edit the merchant keywords to exclude this information.


Add notes or labels:
Tap Add Labels to choose or create a label, or Write a note... to add a note:

Add an attachment:
Tap the attachments field to add an attachment.
For more detail on adding files and photos to transactions, please see: Adding attachments to transactions

Transfer marking:
To mark a transaction as a transfer, simply select the checkbox to ' Mark as transfer' on the transaction edit form.

Split transactions:
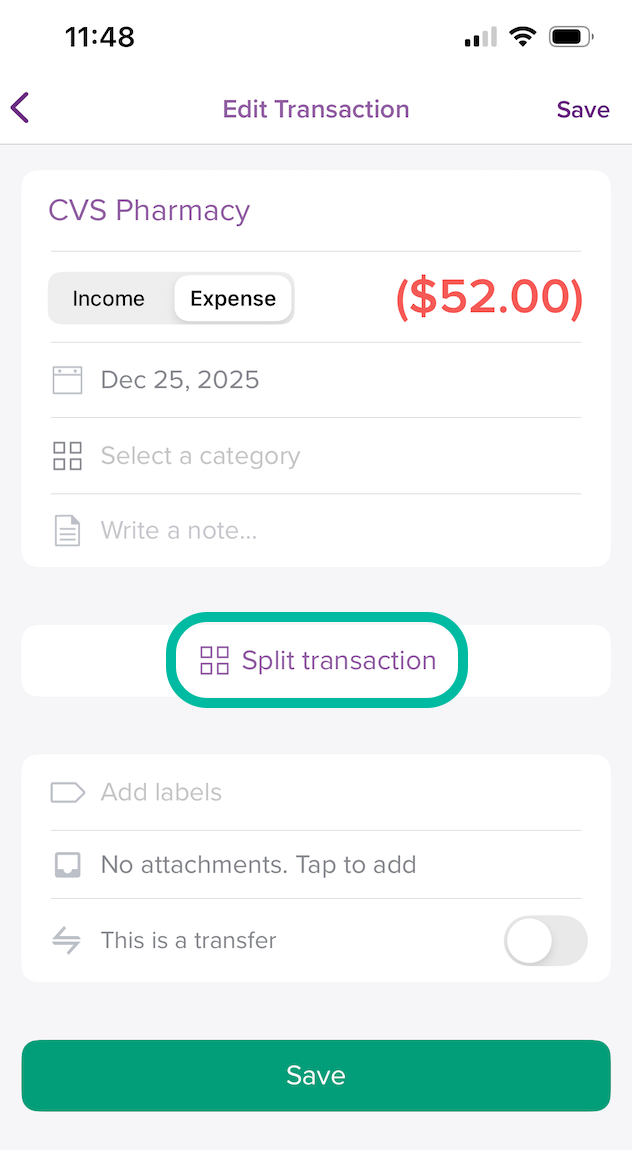
You can split a transaction into smaller amounts and categorise these differently.
- Open the transaction you would like to split
-
Select Split transaction:
-
Enter the amount of the transaction you would like to split, and assign a category for this:
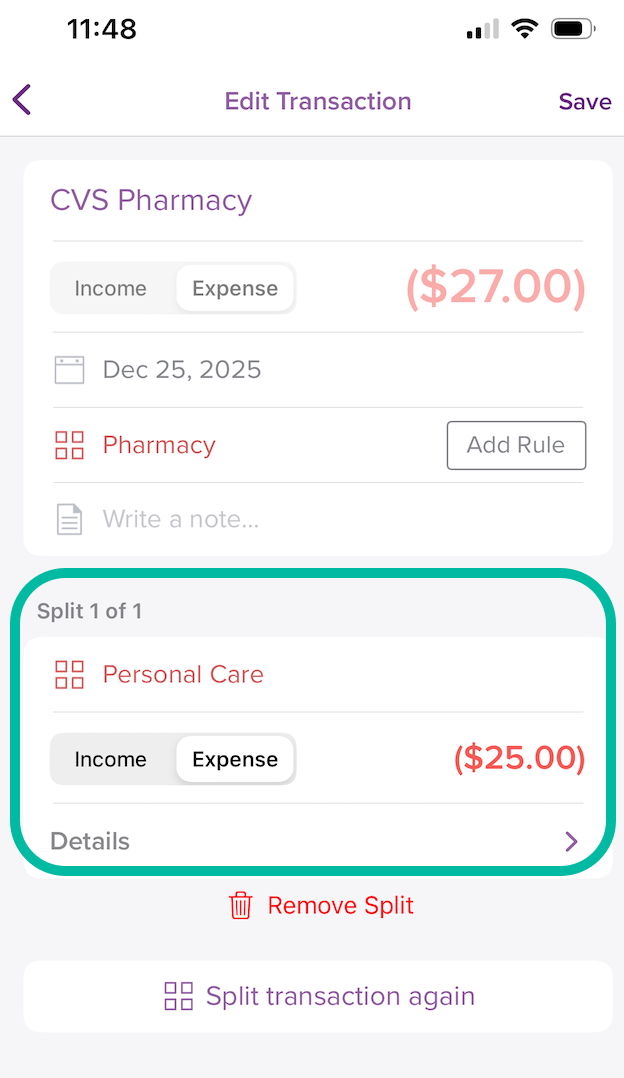
If you would like to split the transaction further, select Split transaction again.
- The amount of the original transaction will update to reflect this new balance automatically. Apply the category you would like to this split
-
Hit Save.
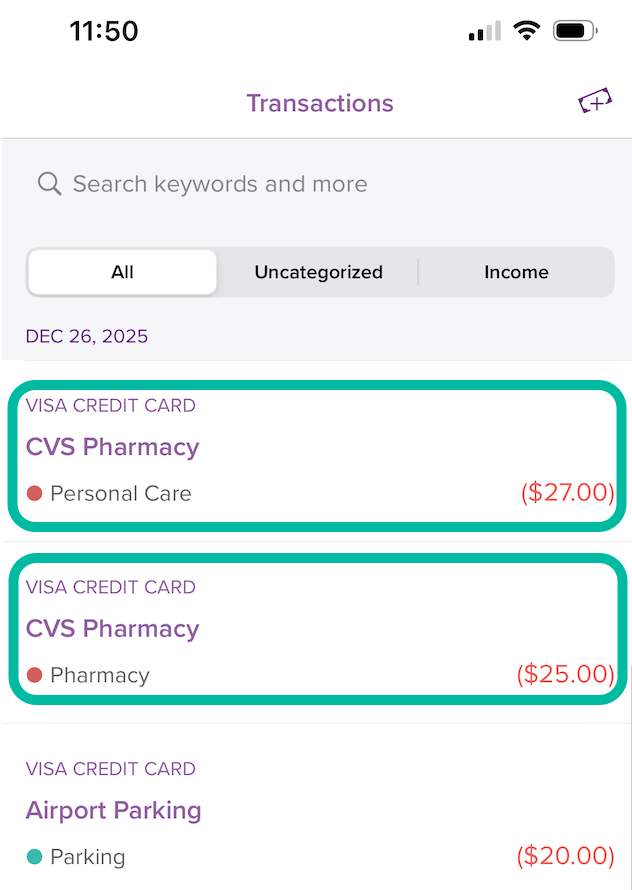
This will now be split into two smaller transactions with their different categories assigned:


Transactions search
Tap the Transactions widget from the Dashboard to search your transactions! You can also access the search bar from the Transactions tab.


Attachment Inbox and adding attachments to transactions
You can now add attachments via the iOS app. Add attachments directly to existing transactions, or, if you've just made a purchase on the fly, you can store a photo of the receipt in your Attachment Inbox for attaching once the transaction has been imported into PocketSmith.
View your Attachment inbox
Tap on the Attachment Inbox to view any unassigned attachments.


Add files or photos to your Attachment Inbox
Use the Attachment inbox widget to add and store a photo or a file until your transaction is imported into PocketSmith. The Attachment Inbox widget has two options for uploading attachments:
- take a picture and upload, or
- upload from the files on your phone
Once you have taken a picture or chosen a file, a preview will be generated. Click Upload to confirm your selection.


Adding attachments to transactions
To upload an attachment to a transaction, tap the transaction in the Transactions tab, and tap the attachment inbox field.
Tap the ' +' icon and choose how you'd like to upload your attachment. You can choose to take a photo, upload from the files on your phone, or choose from the files stored in your Attachment Inbox.


Once you've taken your photo or made your selection, a preview will show. Tap ' +' to add additional transactions, or tap '<' to return to the transaction edit form. Tap Save to save your transaction.


Removing an attachment from a transaction
To remove an attachment from a transaction, tap the transaction in the Transactions tab, and then tap 'View attachment'. You can then tap the file, then select 'Delete'


Transaction confirming
Transaction confirming is an optional feature in PocketSmith, but if you like to confirm your transactions, you can quickly do this from the mobile app too!
Tap the Transaction confirming widget from the Dashboard to see a list of your unconfirmed transactions. Tap OK to confirm each transaction, or tap on a specific transaction if you want to make changes to it before confirming.


Settings and security
You can add additional security to PocketSmith on mobile by adding a privacy pin from the settings tab. If this is turned on, you'll need to enter your 4-digit pin to open the app.
Tap the icon in the top right of the app to access the settings screen.


Once you've set up a pin, this will also enable Touch ID to access the iOS app!
Dark mode (iOS13 only)
If you're running iOS13, and you've enabled Dark mode, PocketSmith will also change to a new dark mode display.

You can enable or disable dark mode in the iOS app, separate to the iOS settings, as shown below.

Cash transactions & cash accounts
If you frequently use cash to pay for things, you may have created a cash account on the PocketSmith web app to track these transactions (learn more here: Dealing with cash transactions). You can also easily add cash transactions and set up new cash accounts straight from your mobile device!
Adding new cash transactions and creating cash accounts
- 1
-
In the iOS app, open the Transactions page
- 2
-
Tap the Add cash transaction button in the top right corner

-
Note
If you don't already have a cash account, tap Add a cash account. From here, you can give the new cash account a name and starting balance, then tap Create new account to save.
-

- 3
-
Add the details of your cash transaction in the fields provided:
- Merchant Name
- Account (you can create a new cash account by selecting the Account field and choosing + New Cash Account)
- Income or Expense & Amount
- Date
- Category
- Notes
- Labels
-

- 4
-
Tap Save (or Save + Another if you'd like to add more)


Alert
If you created a manual cash account on our web app before January 28, 2018, this will not be available from the Account options on the mobile app. You'll just need to change the account type (on the web app), so it is an official Cash account as outlined here: Edit the details of your account
Deleting cash transactions
- In the iOS app, locate the transaction you'd like to delete, either from the Transactions page or from its respective account via the Home page
-
Tap the transaction

-
Tap Delete

Changing the balance of a cash account
If the cash account balance is incorrect, it isn't possible to change this within the mobile app. However, you can do this on the web app by updating the Calculated closing balance option. Learn more about changing this here: Balance options for an account
Managing your subscription on mobile devices
While you cannot alter your subscription from within the PocketSmith Sidekick app itself, you can do this via your mobile browser 🙌 .
Check out Managing your PocketSmith subscription on mobile devices for all the details.
Troubleshooting
Offline behaviour
PocketSmith's mobile apps are cloud-based and, as such, require internet access to operate.
If your mobile device is offline, you'll see the following message:

Once you have internet access again, the app will function as normal ⚡️
Why have I been logged out?
You will be automatically logged out of the mobile app if you do not use the app for more than 30 days.
Logging out of the iOS app
-
Click the Profile menu in the top right hand corner:

-
Click Sign out:


You'll then be logged out of your PocketSmith account on the mobile app. 🙌