Importing bank files into PocketSmith
Importing a bank file is an alternative method for bringing your transactions into PocketSmith 📁 📥 🙌
If no bank feed support is available for your bank in PocketSmith, or you prefer not to use bank feeds, then using bank files is right for you! You can also use bank files to import transactions older than those brought in by the initial bank feed import.
In this user guide
Preparing bank files to import into PocketSmith
If you are importing bank files into PocketSmith, it is best to have your bank files prepared. Most online banking services provide export options for bank files in OFX, QFX, QIF or CSV format. You will need to have your files exported from your online banking website before they can be imported into PocketSmith.
Learn how to export your bank files from your online banking website here: Preparing your bank files & accepted file types
Once you have exported the bank files from your online banking, you are ready to import them into PocketSmith!
Importing bank files from the welcome page
If you have just signed up to PocketSmith, you can import bank files to set up new bank accounts.
-
Select Upload your data

-
Once you've prepared your bank files you can go ahead and click UPLOAD FILES FROM YOUR BANK

-
Double-check that you've exported your bank files in the correct format. Then click START UPLOADING BANK FILES

-
Our Quick Importer tool will open, and you can drag and drop (or click to browse) the files you would like to import.

-
After adding a bank file, you'll need to create a new account for this file to be imported into. To do this, add an ACCOUNT NAME, BANK NAME and TODAY'S BALANCE.


- You may notice some different options to apply to the import. We have outlined what these different options are below.
- To add any additional files, you can create new bank accounts for these, or just add it to a previously created account. Once you've added all of your bank files that you'd like to import, click Start import


Importing bank files into a new account on the Account Summary page
If you want to create a new offline account using a QFX, OFX, QIF or CSV bank file after you have completed your checklist, you can do this from the Account Summary page.
- Head to the Account Summary ( Manage > Account Summary)
-
Hover over New offline account and click From a file import then select the bank that the account belongs to, into which you'll import the file

Note
If you want to import a bank file into a new account that belongs to a new bank that doesn't exist in your PocketSmith account, you'll just need to add the bank before following these steps.
On the Account Summary page, select +New Bank from the left sidebar, enter the name of the bank, select the option Accounts from a file import, and click Save. This bank will now show as an option when choosing New offline account > From a file import
- Add the account name, opening balance, account type
- Click Save and continue
- Drag and drop or choose the file you'd like to import
- If you're importing a CSV file, choose a CSV format or create a new format and assign the columns appropriately
- You may notice some different options to apply to the import. We have outlined these different options below
- Select Import my transactions > click OK
Importing bank files into an existing bank account on the Account Summary page
Drag-and-drop a bank file onto an account in order to import your latest transactions. Alternatively, you can upload files via the account's MANAGE ACCOUNT menu.
Note
If this account was previously updated via a bank feed connection, the data feed will need to be unlinked from the account before files are imported. You can find more about this, including how to unlink your existing connection to avoid duplicate transactions, here: Unlinking your data connection from accounts and importing bank files
Drag-and-drop bank files
- Head to the Account Summary page ( Manage > Account Summary)
-
Drag-and-drop the file you'd like to import onto the Account

- If you're importing a CSV file, choose or create a CSV format
-
Select the appropriate import option and then click IMPORT MY TRANSACTIONS then click OK
Note
For grouped accounts, this method of importing files will default to the primary transaction account for the group.
If you'd like to upload your file to a secondary account, you can do so by first selecting the relevant institution in the sidebar. The account cards for each account within the group will now display individually, allowing you to drag-and-drop the file to the desired account.
Import bank files from the MANAGE ACCOUNT menu
- Head to the Account Summary (Manage > Account Summary)
- Navigate to the bank account that you'd like to import a bank file to
- Click MANAGE ACCOUNT > Import bank file
- Drag and drop, or choose the file you'd like to import
- If you're importing a CSV file, choose or create a CSV format
- Select the appropriate import option and then click Import my transactions > click OK
Importing multiple bank files to your accounts via the Transactions page
If you'd like to upload multiple bank files to your accounts at one time, you can do this via the Transactions page.
Note
If this account was previously updated via a bank feed connection, the data feed will need to be unlinked from the account before files are imported. You can find more about this, including how to unlink your existing connection to avoid duplicate transactions, here: Unlinking your data connection from accounts and importing bank files
- Head to the Transactions page
-
Hover over + Add and then click Quick import

-
Drag-and-drop the files you'd like to import

-
Match the bank file to the correct bank account using the account dropdown menus

Note
We recommend using OFX where possible, as PocketSmith will attempt to automatically choose the right account when they’re uploaded.
- If you're importing a CSV file, choose or create a CSV format
-
Select the appropriate import option and then click Import my transactions

-
Select Start Import

Bank file import options
Transaction overlap options
When uploading a bank file into an existing bank account, PocketSmith can pick up any transactions that occur on overlapping dates - i.e. on the same date as any existing transactions within the account.
You are able to select how PocketSmith handles transactions on overlapping dates:

-
Leave transactions on overlapping dates out
This keeps the original transaction and prevents any transactions with the same date as an existing transaction from being imported
Alert
Please be aware that selecting this option may lead to missing transactions on overlapping dates.
-
Replace transactions on overlapping dates
We recommend this option to avoid missing any transactions; however, any existing transactions on overlapping dates will lose their previous edits, such as labels or notes. Where possible, it's best to import bank files with minimal overlap of existing transactions.
Alert
Selecting this option replaces all existing transactions within the date range your bank file spans, not just the transactions that match ones in the file.
Example: if you import a bank file containing transactions from Feb 1–10, every existing transaction in your account dated Feb 1–10 will be replaced by the transactions in the file, including any existing transactions that are not included in the file being uploaded.
-
Keep all transactions (may result in duplicates)
We generally do not recommend this option
Tip
To avoid duplicate or missing transactions, we recommend you:
- Export your bank file from the date of the most recent transaction in the account within PocketSmith you'd like to upload the file to.
- Then choose Replace transactions on overlapping dates when you upload the file.
This ensures no transactions are missing — though you will lose any edits (such as labels or notes) made to previously posted transactions within the overlapping date range.
Amounts in the statement file are reversed
This checkbox should only be selected when the transaction amounts are incorrectly imported as expense or income. This option is available because some credit card providers show debit amounts as a credit or credit amounts as debit. For more information about this check out our user guide: Expense transactions are showing as income (or vice versa) after importing my bank file

CSV file formats
CSV files are plain text files that do not come in a standardised format like OFX or QIF files. This means that different banks may provide CSV files in various layouts.
When you import a CSV file, you need to identify and choose what is in each column (i.e. merchant, amount, and date) so that PocketSmith knows how to import the file.
Setting up a CSV format
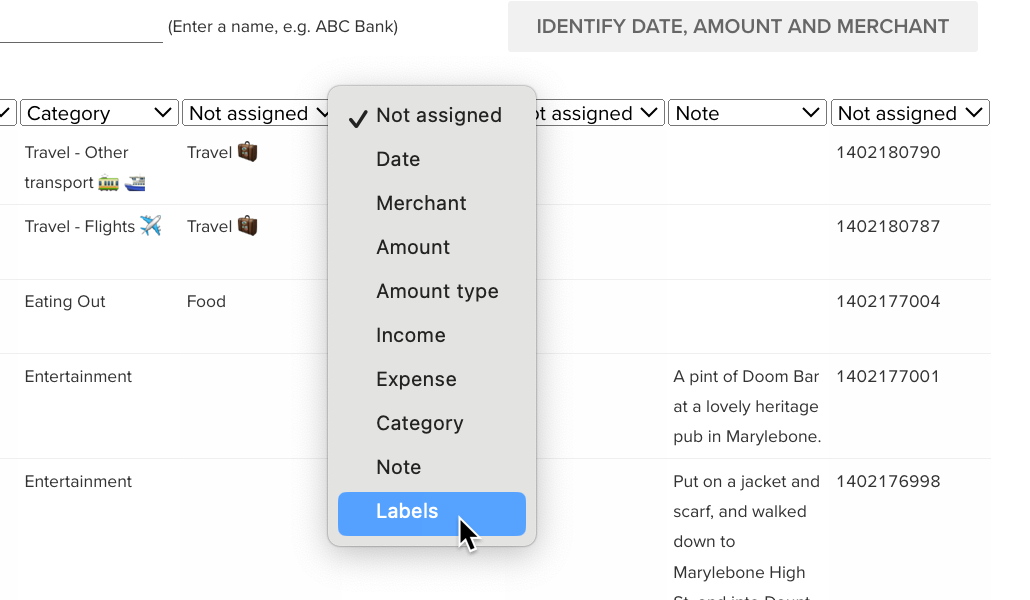
When importing a CSV file, PocketSmith will ask you to review all the columns of your file.
In order to import the file, you'll need to identify the Date, Amount, and Merchant.
However, you can also allocate categories, labels, and notes if they are present in your file. Simply allocate the appropriate header to the column via the drop-down menu and save the format to import. Any column that remains 'not assigned' will not be imported.
To learn more about how to manage categories within CSV files, see: CSV files and categories
Note
You may need to scroll to the right of the file to see all of the available columns.

Once you’ve assigned the columns and are happy with the CSV format setup, you can save the format and use it for future CSV bank file imports 🙌
Deleting saved CSV formats
If you need to delete a saved CSV format, you can do so following the steps outlined below:
-
Head to Profile menu > User preferences

- Select Saved CSV formats from the left menu panel
-
Navigate to the saved format you wish to delete, and click on the trash can/rubbish bin icon, then click OK

